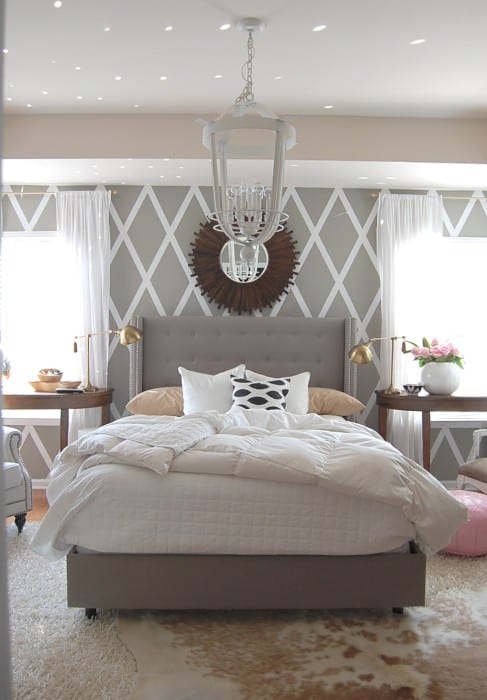

I made one last tweak to our bedroom. The diamond wall…

I promise this is the last time I’ll show you this photo..at least for a long time because it doesn’t look quite like this anymore.

After two and one half hours and about $25 worth of duct tape we have a sassy walled room.

I wish I could say I had this grand idea to put tape on my walls from the beginning but what happened was more of a dare. Scotch Colors and Patterns Duct Tape challenged me to create a project and I tried four different ideas (a chair? a lampshade? planters? a vine?) until I was happy with the results. I LOVED this challenge it goes right with my whole Lovely Limitations Theory–limit what I can use, and I’ll be more creative (as long as I have time to think about it).
I wanted to come up with a project that looked good enough for people to actually want to do, was easy, and that the duct tape was a short cut, not whatever the opposite of short cut is (long cut?).

I also wish I could say that I was patient to a fault but that role in our family is played by my husband. And this project requires about an hour of steadfast patience. This man has a lifetime supply. I pretty much laid on the bed and talked incessantly while he worked.

But, I did let him take breaks.

I had this idea lingering in my head for a few years. I’ve watched people on blogs tape off stripes in a room so they could paint. It seemed painstakingly slow (remember, I have no patience for projects). And one project I remember the tape was nearly the same color as the paint and part of me thought it was sad that they couldn’t just leave the tape up and not paint. Dear Scotch Colors and Patterns Duct Tape, please consider creating 6 and 12 inch wide rolls of tape in a matte finish so I can finally have stripes on my walls.

We only did the main wall in the room. I’m usually not a fan of accent or “show off walls” but it works in here.
Supplies?
- 3-4 rolls of Scotch Colors and Patterns Duct Tape (I’m partial to the white–it’s a phase, but they have pink and turquoise plaid and paisley and everything in between).
- X acto knife
- measuring tape
- laser level or plumb line (we made our own with a string and something heavy tied to it)
- patience
Before we started I made a mock-up of how big I wanted the diamonds to be. Diamonds look their best when they are twice as high as they are wide. I figured a 30 inch tall diamond would be nice so, from the top center of the wall I made a mark on the wall (mark 1) measured down 30 inches and made a mark (mark 2). Then I measured down 15 inches into the center of where the diamond would be (halfway) and then 7.5 inches over to the right (mark 3) and 7.5 inches over to the left (mark 4). I was left with 4 marks on the wall that marked the points of the diamond.

I slapped some tape up just to get a feel for the size and yep, I liked it so I took it down and used those marks as our starting point. From there, we measured and marked 15 inches over and 30 inches up across the entire wall. And by “we” I mean my husband.

It took a few hours (but that includes a quick run to the store to get more tape) and the results were stunning. Here’s a little 3 minute video that documents most of the process.
It’s been a month since we first put the tape up. Because the decorative duct tape isn’t as sticky and intense as the silver, heavy duty duct tape, when you peel it off, there isn’t any damage to the walls so far, just some discoloration–like when you remove vinyl lettering. I’m willing to prime and paint the wall in the future –something anyone would need to do when they are done looking at the diamonds, but, the tape saved us a lot of work on the front end. It would have taken a lot more time to tape off all the diamonds and paint them.
Special thanks to Scotch Duct Tape for sponsoring this post and for their challenge to create a project using tape from their new Colors and Patterns Line a new brand that helps you find your style that sticks–I LOVE a good challenge, wish every company would do things like this!
Related Posts:
Update:
Two years after this post, we moved out of this house (it was a rental) and I took an afternoon to peel off the tape (it came right off but did leave some sticky reside or dark spots in some places. Then I did a quick sand and repainted the wall. All in all, it was about 2.5 hours of work–WELL worth it for two years of enjoying this wall treatment! I do think it helped that this wall had a few coats of paint on it before the tape, if you are taping a brand new house with one thin layer of paint on the walls, when you go to remove the tape, it could peel off more than the top layer of paint.